Most of us like to keep things as simple as possible.
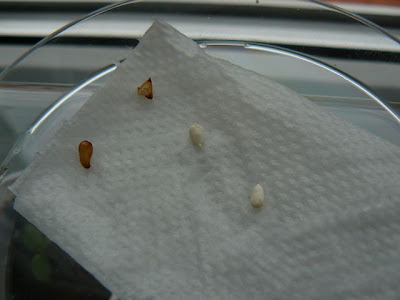
Today I planted another nine rose seeds, this time I kept the testae ON these embryos deliberately, to see how they will germinate, compared to the nine bare embryos I have planted. Everything has been done identically, and the seed is from the same hip as the nine bare embryos.
Seven of the nine seeds had small slits on their testa covering that were not done deliberately, but were a result of the box cutter cutting into the achenes and coming too close to the testa. I see this as a bonus in using the box-cutter knife. The small slits were mostly clear of the radicle end of the seed, but some were close to the radicle end…(these small slits should enhance the germinability). Two of the seeds actually showed NO visible tearing at all.
Results will be posted over the next few weeks.
Here are the nine seeds after an overnight water soaking, just before they were planted this morning:
George, thank you, that you keep us informed about your progress and your variations with this method. Also many thanks to Don, for providing the article.
I started also with the embryo culture, modified you jar cultur, using petri dishes.
Instead of the 4-5 inch deep pots I have been using for the rose embryo/rose seed germinations, (where I suspect some seed had dived too deep and subsequently rotted in the past), I am now searching to find shallow “plug trays” similar to the ones Paul Barden mentioned on his blog, recently. I hope they are available in this country! (see link below to Paul’s blog showing his picture of this system in action).
Pictured here is the seed coat (testa) that I found underneath the seedling pictured above.
The embryo clearly exited from the end opposite the radicle end, which is highly suggesive that the micro-slit from the box-cutter offered the path of least resistance to this seedling/embryo.
In the picture below, dirt marks the point of exit of this seedling.
As far as the nine bare ebmryos in the pot goes, I got three nice germinations…and then nothing for several days. I just lifted the dirt up to see what is going on with the other embryos…and found three green but sad looking embryos with transluscent rootlets (a bad sign) and was unable to find the other three… So say this pot gave probably 3/9 germination rate at worst, for this varietal.
To my horror, yesterday I also noticed that the sun had been hitting the pots directly for several hours in the middle of the day, through gaps around the shade cloth, and some caking/crusting has occured in the germination media. My guess is that these embryos were accidentally baked.
At this point I am thinking that:
I must choose a better position where the pots can be guaranteed no direct sun.
I might have to develop my own formula for a better seed-raising mix which does not cake-over/crust.
I am thinking some sort of peat moss/sand mix I can do myself would be better. Can anyone here help out with suggestions for what makes a good airy rose seed-raising mix?
This morning I did another two sowings of mature rose embryo and seed.
This time I used two very shallow (approx. 1.5 inch deep) plastic rectangular pots. I used the same commercial seed raising mix (this is all I have at the moment to use!), but I did not pre-flood it with water this time. I just used it as it was (moist) out of the bag, nice and fluffy, not compressed down by heavy watering.
In one pot I placed two ‘Flower Carpet x OP’ bare embryos. In the second I placed 17 rose seeds (ie. achene removed but testa covering intact). These 17 rose seeds were from a floribunda-type rose bush. I had pre-soaked these embryos/seeds overnight as usual, to get them nice and plump.
After burying these very superficially, I then hand mist-sprayed the surface till it was wet, but this time I made very sure no compression of the germination medium occurred, by this final “watering-in” step.
Then I placed both pots into a 10 litre plastic bucket, with a small amount of water at the bottom of the bucket, to allow constant watering from below.
I brought this bucket indoors.
I am going to do nothing else to these, and see what happens. Maybe I’ll get more consistent and better results…or maybe they will rot. We shall see.
If I don’t try these variations, I’ll never be able to work out what I am doing wrong. The fact that some bare embryos have germinated at close to 100% in some pots, and others at 10%-30%-50% in other pots at other times, makes me think that there are some factors in my sowing procedure causing this inconsistency.
To be complete about this, I also found a tiny white caterpillar-like grub nibbling at the root zone of one of these two seedlings (it was buried in the root zone)! This factor could definitely be affecting results. I never imagined commercial “seed raising mix” could contain such critters, but there you go.
I am going to switch to a soil-less germination medium of some type.
I have no idea what makes a good soil-less germination mix for rose seed. Can anyone here please advise?
In this country a lot of people use something like Pro-Mix, or Metro-Mix. Originally developed at Cornell University, most are based on varying proportions of sphagnum bog peat, vermiculite and perlite with trace elements added. Recently ash of pine bark has been added as a cheap source of some minerals. The soilless mixes used for growing potted plants in the nursery trade may contain composted pine tree bark. It decomposes more slowly and so is favored for that use. I don’t think it’s the greatest for rose seeds but I have done OK with it. But after a couple weeks you have to add in some liquid fertilizer. Common ones here are Peter’s soluble, or Miracle-Gro. Watch out for the ammonium and urea in modern formulations. When ammonium nitrate went out of fashion (by law)it was replaced with ammonia and urea which are much more prone to burn foliage.
The other day I was looking at a website for Hummert International (from a nearby town), where several different soilless mixes are described. You can also read about the Cornell mixes I believe by a google search.
If you check out growth media for Arabidopsis by google search you can find variants on the ones I mentioned above. It requires relatively low nutrient levels, in a porous, fine-grained medium (because its seeds are so small) and so is good for germinating things but will need supplementation once the seedlings are well established.
My first attempt to grow seeds 2 years back I had 120 seeds in 100mm deep trays in my laundry and only 8 seeds appeared.
I had small caterpillars crawling about on the growing medium and I actually saw them crawl into a split in the seed case. I had a lot of seeds that year that split but no growth appeared.
I assumed they were fungas gnat larvae and my soil mix was too wet.but I did not think they came in the mix although it is a possability. They were very small(about 4mm x 1/2mm) and white. By the time I identified them the damage had been done.
The next year I used perlite as a topping and have not had them since. I don’t know if I solved the problem or it was just luck.
Further to your observations, and those of others on this forum, it is probably high time I switched over to perlite as the topping/covering over the seeds/embryos/achenes I sow from now on.
It might solve several of the problems I have had with the plain seed raising mix, including the “crusting-over” of the surface.
I might also incorporate some of it into the seed raising mix as well, depending on what it looks like…I must get a bag of the stuff very soon.
You are doing very well in such a short career at embryo work. Since you have got this far with it, it is just a matter of time and practice, and you will get better, to be sure.
Why are some of your embryos stained yellow (are you applying fungicide to them)?
It is strange but I have only ever encountered fungi once or twice, in hundreds of runs so far, for whatever reason. Maybe it is becasue I don’t use paper toweling?..I really don’t know why…but I have never used fungicide or any other chemicals on the embryos. The only fungus attack I encountered that immediately springs to my mind was in the Clinophylla seed Viru sent Simon…I actually cannot remember another fungus epsode in all my embryo work right at this minute…it was STRANGE!..But those embryos looked nearly all dead the minute I looked at them upon extraction…and that is the reason they supported the fungus.
I know that embryos that are dead/near dead at the time they are extracted from the seed (rare event) or any dead tissue left on live embryos (like bits of testa) will definitely make a fungus culture…So make sure the embryos are washed very well and that you have removed all of the inner circular layer of the testa. The key to knowing they are completely extracted with no testa debris stuck on them, is that they should have a uniform pearly white shiny appearance all over them, with no blemishes or dull patches on them at all.
The most likely reason why bits of the inner testa may remain on the embryo surface and cause fungus-in-culture, is that the embryos were too dry (and/or dead), and the inner circular layer was stuck onto the embryo surface. Be mindful of this. If the embryos do not “slip out” of the opening you have created in the testa, put them in water until they hydrate, so that they “slip out” cleanly without foreign debris stuck onto them. Foreign debri from the inner testa will remain partly stuck on the surface of dry/dead/near dead embryos that were forced out by scraping them out of the testa… This is exactly what happened with my clinophylla run (see notes above posted a few months ago about that run).
I am still working on the idea of just direct planting of the mature embryos in seed raising mix. I am starting to get some very good results with this idea. If it continues to work this well for me, then I will be using it all the time in preference to jar culturing for my embryo work. I’ll post more about this when I have done a whole lot of runs, to be sure what I am talking about its reproducible.
Good luck Bernhard, and please post more about what you are doing with your embryos!
I know that embryos that are dead/near dead at the time they are extracted from the seed (rare event)>>>>>I know that embryos that are dead/near dead at the time they are extracted from the seed (NOT SO RARE AN EVENT)<<<<<